So
you’ve decided to take the plunge and assemble your own desktop PC.
Maybe you’re ready to take your PC gaming to the next level, build a
tiny entertainment machine, or just save some money by assembling your
own budget machine. Whatever your intentions, our five part guide is
here to help you.
Before
you can get to building, you need a plan. The old adage “measure twice,
cut once” is in full effect here: you’ll want to carefully select your
PC components to make sure they’re all compatible with each other, and
with what you want to achieve. So this entire article will be about
selecting your parts, before you ever spend a dollar or touch a
screwdriver.
Why Build Your Own PC?
The
pros of a home-built PC are many, but it’s a good idea to make sure
it’s right for you. You don’t want to get in too deep and regret your
decision.
For example, building a PC can be
cheaper than buying a prebuilt one—but it isn’t always! If you’re just
looking for a general purpose computer, buying an off-the-shelf Dell is
going to be way cheaper than building one yourself. You just can’t
compete with the prices they get on bulk parts. Not to mention they come
with warranties—if you’re the type of person who needs outside help
when something goes wrong, you’ll probably be better off with a PC from a
store who offers service.
However,
if you’re a moderately knowledgeable user looking for a more powerful
PC (for gaming or video editing) or a more specialized PC (like a
compact home theater PC), you are much more likely to save money by
building. “Gaming” PCs from companies like Alienware have big markups,
and you can save a lot of money by building the machine yourself.
Building
your own PC has other advantages, too. You can upgrade it at any time
to keep it current without buying a new machine (since there’s less
likelihood of proprietary or soldered-on parts), or even overclock it to
access some extra power.
But
the reason I love doing it, and the reason most enthusiasts swear by
it, is that there’s a satisfaction in personally selecting and handling
each individual part that goes into your computer. It’s fun (for people
like me, anyway) in the same way that working on your own car is fun.
And, since you don’t need years of practice to do it, it’s a whole lot
easier.
If
the length of this guide or the complexity of the components seem
intimidating, don’t worry. It’s kind of like assembling flat-pack
furniture or a set of LEGO with instructions. Everything fits together
in a very specific way. If you follow this guide, you’ll be just fine.
Choosing Your Parts

There are six components that you’ll absolutely have to use in order to assemble a working PC. They include:
- Case—the PC case is what holds all the internal components together in a structure. Also known as an enclosure or chassis.
- Motherboard—the connective tissue of your PC build. Every other component will be attached to or plugged into the motherboard in some fashion.
- Processor (or CPU)—the central processing unit, which acts as the “brain” of your PC. This will broadly determine the speed of your computer. You’ll have to choose a CPU and a motherboard that are compatible with each other, both in terms of manufacturer (Intel or AMD) and the CPU socket itself.
- Memory (or RAM)—RAM stands for random access memory. This is a crucial component of your computer’s operation. You need to choose RAM that’s compatible with your motherboard’s RAM slots.
- Storage—your hard drive (HDD) or solid state drive (SSD), the part of the computer that holds the operating system and all your digital files. SSDs are much faster than hard drives, and are highly recommended these days, though HDDs are generally larger and cheaper.
- Power Supply (or PSU)—a heavy little box that regulates the electricity going into your computer and provides power to the individual components. The power supply will directly connect to the motherboard, CPU (through the motherboard), storage, and other add-on components as necessary.
Those
are just the pieces you’ll need to get a computer up and running. For
more complex builds, you can add any or all of the components:
- Monitor, mouse, and keyboard—if you’ve upgrading from a laptop, you might not have these already. Be sure to buy some or your computer will be an extremely cool-looking brick.

Want
to get crazy? There are all sorts of add-ons that you can use,
including entirely cosmetic stuff, like lights and cable sleeves. Check
out this article if you’re looking for a deep dive.
Also, for the assembly of the PC and installing Windows (covered in the following articles in this series), you’ll need:
- A screwdriver
- A USB drive with at least 8GB of space
- Access to another working Windows computer (a public library PC should work fine)
With all that in mind, let’s talk about where to buy your parts, and how to go about selecting them.
Where Should I Buy My Parts?
If
you’re looking to secure your parts at retail, it will be tough these
days: since computer supply stores like CompUSA went out of business,
there aren’t many places you can go in the US to find all the parts
above in the same store. Best Buy, Fry’s Electronics, and Micro Center are
more or less the only national chains still going (and they’re not even
available in all areas). You might be able to find more general parts
like graphics cards and storage drives in office supply stores, like
Staples and OfficeMax, but you won’t be able to buy the whole build
there.
If you want computer parts, the best place to look is online. And generally speaking, the best places to look online are Amazon and Newegg (again,
in the United States). With millions of parts in stock, they’ll
generally have the best prices and selection between them. You might be
able to find deals on smaller sites, though—it wouldn’t hurt to look
around a bit.

The best way to shop, in our opinion, is to use the following process:
- Start planning your build by looking at a site like Logical Increments (shown above). It lists a number of builds at different price points, and while you don’t need to follow it to the letter—by any means, it’ll give you a good idea of what a balanced build will look like at each budget level, which will keep the rest of the process from being too overwhelming.
- From there, we recommend you start browsing parts at Newegg, even if you don’t necessarily plan on buying the parts there. Newegg has fantastic search filters and spec lists that will help you browse for the parts you want. You can start with Logical Increments’ base build and swap out certain parts you like better, or start selecting parts from scratch—your call.
- Once you start gathering parts, plug them into a tool like PCPartPicker. It has a huge database of PC parts, and knows which parts are compatible with each other, ensuring you don’t accidentally order parts that don’t work together. Then, it’ll show you which retailers have the best price on each of those parts, so you get the best possible price on the total build.
Logical
Increments and PCPartPicker are great tools, but they aren’t the only
places to do research and make your selections. Here are our favorite
free tools for PC builders.
So
now you know the basics of what goes into a computer and where to start
your shopping. Let’s talk about how to select the right parts for the
job.
Which Parts Should I Chose?
Here’s
where a lot of people get tripped up. How powerful does a full-sized
desktop need to be? Should you buy an Intel processor or an AMD one? Do
you need a graphics card, or will the CPU’s on-board graphics be okay?
How many watts do you need in a power supply?
Let’s
break it down piece by piece. Understand that you generally want
components that have been released in the last year or two, because
going back further tends to trade price for efficiency and
future-proofing. And generally speaking, the more expensive a part is,
the more powerful it will be.
Processors


Let’s
start with the brain of your computer: the CPU. This will determine
which other parts are compatible, so it’s a good place to begin.
AMD or Intel? The
first question you’ll have to answer is: which brand? These two
processor manufacturers have been duking it out for decades. It
generally shakes out like this: Intel sells more and has more raw power
available at the high end of the market, while AMD competes on price and
power efficiency. For example, Intel’s latest Core X series processors
offer ludicrous amounts of speed and cores for those who can spend well
above $500 on processors alone, while AMD’s Ryzen series competes on
frugality, with savings of several hundred dollars at the same general
performance level.
Generally
speaking, Intel processors fare better in gaming and high-end media
applications due to their raw power and popularity, but if you’re on a
budget, AMD’s general price advantage may be worth choosing the less
popular option.
AMD
also offers designs that have much more powerful integrated graphics
than Intel, referred to as “APU” models. These APU designs can handle
light 3D gaming, whereas Intel’s integrated graphics aren’t generally
enough to hack it. They’re also great for applications like home theater
PCs.
Which Model? Once
you decide which brand to go with, it’s time to narrow down your
processor selection. You might recall that computers used to be
advertised based on their processor speed, expressed in megahertz and
gigahertz. Those figures are still around, but thanks to advancements in
processor design, it’s hard to express exactly how powerful a processor
is based on a single factor like its clock speed. There are other
factors, like how many cores it has, what kind of cache it has, power
consumption, and integrated graphics performance (if you aren’t using a
dedicated graphics card). In layman’s terms: more cache and more cores
means better multitasking performance, more pure speed in each core
means better single-task performance, like rendering a big image in
Photoshop.
Intel’s
current product line includes four main desktop CPU lines: Core i3,
Core i5, Core i7, and the top-line Core i9. There are multiple
processors in each line, generally going from least to most expensive
and least to most powerful. So for the latest models, the fastest Core
i3 processor will be a little slower than the slowest Core i5 model.
(Again, there’s a lot of variation in composition and architecture, so
that may not be true in every single case.)
New
models come out on a yearly basis, and may or may not need a new
motherboard socket depending on the improvements. The “sweet spot” of
value and performance is in the Core i5 series; anything less is
generally for a budget build, anything more is for an enthusiast build.
It’s definitely possible to build a powerful gaming PC with a Core i5
instead of a pricier Core i7. Some models have more cores, some have
faster cores—gamers and media production pros will want at least a
quad-core design, with as much speed as they can get.
AMD’s
lineup for desktops is more split. The latest conventional designs are
called the “Ryzen,” available in 3, 5, and 7 models. Processor cores
increase as you go up the line and get more expensive CPUs. The
top-of-the-line AMD chips are called Ryzen Threadripper, with up to 32
cores. The sweet spot for AMD is in Ryzen 5, either the 4- ore 6-core
chips.
AMD’s
APU models, for more general, less powerful computers, include decent
on-board graphics as well. AMD releases new CPUs and socket designs at
less frequent intervals. Ryzen, Ryzen Threadripper, and APU chips all
use different processor sockets.
If you really want to know which processor is faster in a direct comparison, you’ll need to go look at some benchmarks. This list has a huge selection of current and slightly older processors, ranked by benchmark speed with pricing info.
Motherboards

Next,
it’s time to select a motherboard, the piece that all your other pieces
will plug into. It’s easier than it sounds, though.

Which Socket? You
need to choose a CPU and a motherboard that will fit each other,
obviously, since both Intel and AMD have developed multiple CPU socket
designs for different classes of processors. So, can quickly narrow down
your selection here by looking for motherboards that are
compatible with your processor choice. Check the socket on your chosen
CPU—for example, Intel’s LGA 1151 socket—and then narrow down your
Newegg search to motherboards that contain that socket.
What Size? The
motherboard you choose needs to be compatible with the case you’re
using. We’ll talk about this a bit more in the case section below, but
the basics are: ATX are standard size tower computers, microATX boards
are for slightly smaller towers, and Mini-ITX boards are for more
compact builds. These sizes don’t necessarily correspond to power—you
can have a very budget ATX build, or a very powerful Mini-ITX gaming
machine—but your expansion options will be more limited on smaller
boards, and they’ll be a bit tougher to build with.
What Features? Then,
narrow down your search by motherboards that support all the other
stuff you want—this generally means at least one PCI-Express slot for a
graphics card, enough SATA ports for all your hard drives and DVD
drives, supports the amount of RAM you want, and so on. You can find all
that information on the specifications page.
You’ll
also want to check the back panel, the part of the motherboard where
most of your accessories will plug in. If you already have a monitor,
keyboard, and mouse, you want to make sure that the motherboard supports
them. Most of them will, one way or another, but if for example you
have an older monitor without an HDMI port and you don’t plan on adding a
graphics card, you’ll either need a motherboard with a DVI or VGA video
port, or an adapter.
Which
brings us to the final part of the motherboard: the extras. As
mentioned, most motherboards have support for low-power on-board
graphics, as well as basic sound processing (the little headphone jack
you plug your speakers into) and an Ethernet port for networking. But
some advanced models have support for surround sound output, large
arrays of USB 3.0 ports, and even on-board Wi-Fi so you don’t need a
separate adapter. Choose with extras you want (if any), and pick the
motherboard that has them.
Lastly,
the motherboard’s cable inputs for power need to match the cables on
the power supply, for both the main power connector on the side and the
CPU power connector on top. You can check these values in “pins”: if
your power supply has a 12-pin rail and your motherboard has a 12-pin
connector, they’re compatible. Depending on the CPU socket, the CPU’s
power connector may have four, six, or eight pins, so make sure your
power supply has one of these rails available.
Recommend brands: ASUS, Gigabyte, MSI, and AsRock are all great brands to look for here.
RAM

Memory is deceptively important: it’s the easiest way to turn a slow computer into a fast one. Make sure you get enough.
How Much? For
basic modern computing, I suggest at least 8GB, which you can generally
get in a 4GBx2 stick setup for under $100. Gamers, media creators, and
virtual machine users will want more—the next efficient step up is to
16GB. If you’re building a massive system that will do multitasking all
day long and handle gigantic games at 4K visual quality, you want every
last bit of RAM you can possibly cram into your case (which is usually
32GB or 64GB on today’s high-end motherboards.)
Which Type? You
need to check your motherboard to see which generation of RAM it
supports: DDR3 and DDR4 are the two existing standards right now, and
RAM is not backwards compatible. The number of slots for RAM on the
motherboard and their individual maximum capacity determines how much
RAM you can have in total.
What Speed? You’ll
also need to choose a RAM speed, which doesn’t really produce
noticeable performance differences in most builds. But you might as well
buy RAM modules that are as fast as your motherboard can handle.
Recommended brands: G-Skill, Corsair, and Crucial are all solid picks.
Storage

Here’s
a tip for buying storage: get an SSD. No, seriously, get an SSD. A few
years ago, solid-state drives were considered something of a luxury, but
the speed and efficiency increases are incredible. Now, SSDs are cheap
enough that they’re becoming standard. Even if you need to store a ton
of files, it’s such an improvement that I’d recommend buying a smaller,
cheaper SSD just for your operating system and programs, and using a
secondary hard drive for all your large personal files (music movies,
etc.).
Pretty
much every new motherboard and power supply will be compatible with
current hard drives, solid state drives, and DVD drives. They all use
the same SATA cables and data ports. As long as you don’t have more
drives than you do SATA ports, you’re fine. They also use SATA power
rails from the power supply, which should include enough plugs for at
least two drives.
Recommended brands: Samsung and SanDisk for SSDs, Western Digital, Seagate, and HGST for hard drives
Cases

Cases are generally just boxes to shove your parts into (ahem), but there’s a lot of variety to them.
What Size? PC
cases are referred to in general terms like “full tower” and
“mid-tower,” and these will tell you the size and shape of the case—when
you think of a normal desktop PC, you probably think of a mid-tower.
But PCs also come as bigger and smaller towers, as cubes, or super
compact slim designs for your media cabinet.
You’ll
also want to pay attention to the motherboard size. Motherboards come
in several different sizes, but the main ones for consumer class PCs are
the full-sized ATX, the smaller Mini-ATX and Micro-ATX, and the
positively tiny Mini-ITX. Larger cases will include mounting options for
smaller motherboards; so an ATX-sized case can fit a Mini-ITX
motherboard, but a Mini-ITX case cannot fit an ATX motherboard.
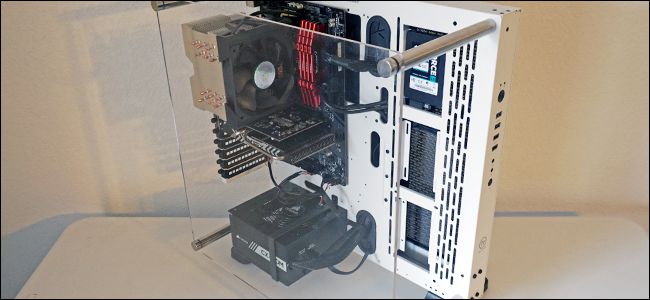
Everything Else: In
addition to size, there’s material (steel, plastic, aluminum, acrylic),
number of storage and expansion drive bays, mounts for fans and cooling
systems, and so on. Aesthetically, most modern cases are either
minimalist—basically looking like a tiny, expensive refrigerator—or
“gamer,” with lots of integrated LEDs and side panel windows so you can
see the guts of your masterpiece.
Cases
also have standardized mounting areas for the power supply. Most cases
will accept a standard ATX power supply, but small Mini-ITX cases may
need a Mini-ITX power supply (though some gaming-branded ITX cases still
take a full-sized version). Many smaller cases will even come with
their own power supplies to avoid this hassle.

Other
factors you’ll want to pay attention to are cable management holes, fan
and power supply placement for airflow, front panel features like USB
3.0 ports and headphone jacks, and of course your general eye for what
you want your computer to look like.
Lastly,
if you’re going to add a discrete graphics card or CPU cooler to your
build, you need to make sure they can fit in the physical dimensions of
your case. Some extremely powerful and expensive power supplies might
need extra room, so check both the specifications of the GPU itself and
the specs of the case to make sure they’re compatible. Likewise, a big,
boxy CPU cooler might be too physically tall to fit into a smaller
case—check the specs for its clearance in inches or millimeters. If
you’re going for a liquid cooling system with a radiator, you may need
to make sure it has adequate space around the case fan mounts, too.
Once
you narrow down your selection by size and features, I recommend
checking out online reviews of cases that you find on retailer sites.
Review sites like Tom’s Hardware, PC Gamer, and AnandTech are
great places to dig deep into the more esoteric features, but you can
find very in-depth reviews with a bit of YouTube searching, too. At the
end of the day, what makes a case great isn’t always the features you
find on a spec sheet—some cases are just much easier and more enjoyable
to build in, while others are difficult and frustrating.
Recommended brands:
it’s hard to find a “bad” case these days—most manufacturers seem to
have the building and ergonomics down to a science. I prefer cases from
Fractal Design and Antec, but Corsair, NZXT, and Cooler Master are all
popular brands with lots of cases. But they aren’t the only ones, so
feel free to shop around.
Power Supply

Your
power supply supplies electricity to every component of your PC, so you
want one powerful enough for your build—and reliable enough for safe,
efficient operation. Power supply selection is a lot more important than
it seems on the surface.
How Many Watts? Obviously,
you don’t want the total electricity used by those components to be
more than it can convert. The biggest draws here will be your
motherboard, CPU, and graphics card. Other components, like the case
fans and the storage drives, use so little electricity that you can
usually fit them into the margins of your calculations.
The
total power draw of your combined components determines how much
capacity your power supply needs, in watts. For example, the NVIDIA GTX
1080 TI, a very powerful graphics card, requests a power supply of at
least 600 watts in its specifications (and both an 8-pin and 6-pin power
rail—see the graphics card compatibility section). The GT 950, a much
less powerful card, needs only 150 watts.
If you’re not sure exactly how much power you need for your system, use this handy calculator.
Just put in the specifications of the components you’ve selected and it
will tell you how many watts your power supply will need. Again, you’ll
still need to make sure that the power supply’s rails match the sockets
on your motherboard, graphics card (if you have one), SATA drives, and
other components.
Modular, Semi-Modular or Fixed:
Some power supplies have their cables (or “rails”) permanently
attached, so you just have to stuff the excess wherever you can—even if
you aren’t using certain rails at all. A modular or semi-modular power
supply, on the other hand, allows all or some of the power rails to be
unplugged from the supply itself. This is an extremely handy upgrade,
especially if you’ll be working on a case with cramped quarters or a lot
of components. If you budget will stretch, go for the upgrade over a
non-modular model.

Efficiency and Quality:
When you shop for a power supply, you’ll often see a little badge
indicating how efficient it is. It’ll usually say something like 80
Plus, 80 Plus Bronze, 80 Plus Silver, 80 Plus Gold, or 80 Plus Platinum.
The higher the badge, the more efficient the power supply will be, the
less noise it’ll produce, and the less you’ll pay in wasted electricity.
Lastly,
you’re dealing with electricity here, so it’s imperative that you get a
safe, well-built power supply. If you get a cheap, poorly-built model,
you’re asking for trouble. At best, it’ll fail early and be unable to
power your PC. At worst, it could harm your parts or even be a fire
hazard. Instead of reading user reviews, we highly recommend going to a
reputable site like JonnyGURU.com,
which is known for its in-depth testing of power supplies for quality.
Search for the power supply you’re interested in, and if it gives the
thumbs up, you know you’re in a good spot.
Note
that some cases may come with power supplies, but in most cases, they
are not high quality ones we’d recommend. This is not the place to
skimp, guys: buy a decent power supply.
Recommended brands:
Corsair, EVGA, and Cooler Master are a few good ones, but there are
many others. But just because a brand is good doesn’t mean you shouldn’t
do your homework—sometimes good brands can make a low quality PSU, so
check those expert reviews before you buy.
Graphics Card

This
is a complicated and contentious choice, but if you’re looking to do
some gaming, it’s one of the most important choices you’ll make in terms
of performance.
Which Chipset Brand? Like
processors, discrete graphics cards come in two primary flavors: NVIDIA
and AMD (yes, the same AMD as before—they bought NVIDIA’s rival ATI
years ago). NVIDIA tends to lead in pure technical power and AMD
typically competes on value, although this can ebb and flow at different
times. NVIDIA also has technologies like GameStream that may be worth
paying extra to you.
Which Manufacturer? There’s
another layer of complication here: NVIDIA and AMD don’t build their
own graphics cards (most of the time), they license their GPU chips out
to other companies who then construct and sell the cards under their own
brands. So you can buy an NVIDIA GTX 1050 card from ASUS, EVGA, or
Zotac, all using the same NVIDIA processor with very slight variations
in the circuit board, RAM, cooler, monitor connections, and other parts.
Start with which graphics chip you want, then figure out which
manufacturer has the card with the features you need.

How Much Power? The
card you get depends on what you want to do. Even if you’re looking for
high-end gaming, you probably don’t need to spend as much as you think.
There’s an enormous selection of cards from a ton of different
companies at all different price points, but a very brief breakdown goes
something like this:
- No gaming at all: use the integrated graphics on the motherboard. It’s free!
- Very light gaming, with older titles or 2D titles: it’s still probably okay to use integrated graphics here.
- Simple 3D games like World of Warcraft and League of Legends: $100 cards or less.
- Intermediate games like Overwatch and Team Fortress 2: $100-200 cards.
- New AAA games like Call of Duty and Assassin’s Creed at up to 1080p resolution and medium settings: $200-300 cards.
- New AAA games at high settings or resolution higher than 1080p: $300-400 cards.
- Super-high-end games at high settings and ultrawide or 4K resolution: $400 and above.
Look at benchmarks, especially for the games you want to play, to see which cards are going to be best in your budget.
Lastly,
make sure the card you buy can get enough power from your PC. Most
mid-range and all high-end graphics cards need a dedicated electrical
connection to the power supply, in addition to being mounted on the
motherboard. You’ll need to make sure that your power supply has enough
rails and the right connection to support it. Check the specifications:
most require either a 6-pin rail, an 8-pin rail, or multiples of both.
The GPU also draws electrical power at a rate that shouldn’t exceed your
power supply’s capacity.

Recommended brands: You can’t go wrong with EVGA, ASUS, GIGABYTE, MSI, and XFX.
CPU Coolers
If
you want to add an aftermarket cooler to your CPU—which you more or
less only need if you’re planning on overclocking it—we recommend Cooler
Master, Noctua, or (if you want a liquid cooler) Corsair. For
compatibility, make sure it supports your CPU’s socket and that it can
fit into your case—the specifications will list its height from the
motherboard up.
Everything Else
Most
of the other stuff you can buy for the inside of your PC will connect
to and draw power directly from the motherboard, like PCI-E expansion
slots or add-ons that use the front drive bays. Just make sure you have
enough connections and space to supply them and you’re fine. The only
real exception is case fans, which can plug into either the motherboard
or directly to the power supply.
Double, Triple, and Quadruple Check Your Parts for Compatibility!
Your
needs for each individual component will vary based on the kind of
computer you want to build, and your budget. You can find help for
selecting the right graphics card or RAM with a Google search (or hey,
how about searching How-To Geek?), but this article is all about
choosing components that are compatible with each other. So before you
make your final purchases, make this last check for compatibility,
checking each part against each corresponding part in sequence.
- Processor: needs to match your motherboard’s CPU socket
- Motherboard: needs to be compatible with your processor, RAM, and power supply (correct number of pins for motherboard rail and CPU rail)
- RAM: needs to match the number and type slots on motherboard (DDR3 or DDR4)
- Storage: needs to fit in your case (enough storage bays in the right sizes?), and your motherboard needs to have enough SATA ports
- Case: needs to fit your motherboard, power supply, CPU cooler, and number of storage drives,
- Graphics card: your motherboard needs the right type of PCIe slot to hold it, it needs to fit the size of your case, and needs the right connector on your power supply
- CPU cooler: needs to fit your motherboard/CPU socket and fit inside your case
- Case: needs to fit your motherboard (can it accept the right ATX or ITX mounts?), power supply (is the bay big enough?), graphics card (is it too long to fit?), and CPU cooler (is it too tall to fit?)
- Power supply: needs the right overall electrical capacity for your build, needs the correct number of pins on motherboard and CPU rail, and needs enough extra rails for graphics card, storage drives, and other power-drawing extras
That may seem daunting, but again, a site like PCPartPicker can do most of the heavy lifting for you—then you can just double check the spec sheet and make sure everything matches up.

When you’ve finally decided that all your parts are compatible and you’re ready to buy, make your purchases and proceed to the next part of this guide. It’s time to build your PC!
Or, if you want to jump to another part in the guide, here’s the whole thing:
- Building a New Computer, Part One: Choosing Hardware
- Building a New Computer, Part Two: Putting It Together
- Building a New Computer, Part Three: Getting the BIOS Ready(come soon)
- Building a New Computer, Part Four: Installing Windows and Loading Drivers(come soon)
- Building a New Computer, Part Five: Tweaking Your New Computer(come soon)
How to Build Your Own Computer, Part One: Choosing Hardware
![How to Build Your Own Computer, Part One: Choosing Hardware]() Reviewed by Unknown
on
14:08
Rating:
Reviewed by Unknown
on
14:08
Rating:

No comments: