
Instagram
has never made it a priority to help users upload images from their
computers, but that doesn’t mean it can’t be done. We’ve got a clever
and completely safe workaround that will have you uploading content from
your computer in no time.
Why (and How) to Upload From Your Computer
If
you’re snapping photos on your phone and sharing them immediately with
friends, this probably isn’t of much interest to you, as you’re using
the Instagram workflow exactly how Instagram intends you to use it. If,
on the other hand, you’re a photographer who wants to upload content
you’ve post-processed in Photoshop, or you’re managing an Instagram
account for a business where your content isn’t coming directly from a
smartphone, then the Phone-immediately-to-Instagram workflow is an
inconvenient mess for you—who wants to save their work on the computer,
sync it to their phone, and then upload it through the Instagram app?
In the fall of 2015, it seemed like Instagram was finally getting
around to acknowledging users that wanted a PC-based workflow when they
released an official Instagram client for Windows 10, but that proved
to be a pretty hollow victory for the people clamoring for a PC
client. Not only was the release limited to Windows 10, but the
application only allows you to upload content to Instagram from your PC
if the PC has both a touch screen monitor and a rear-facing camera (e.g.
it’s a Windows 10 tablet). No touch screen or rear-facing camera? The
upload is, inexplicable and infuriatingly, disabled.

So
where does that leave you, the Instagram user who wishes to upload
content from their PC? It leaves you in a position of having to jump
through a few small hoops to emulate the mobile Instagram experience on
your desktop computer. We recommend doing so by installing an Android
emulator on your PC, and using the Instagram Android app within it.
Third-Party Tools Are Too Risky
“Now
wait a minute”, you might be saying after reading that the hoop you
must jump through involves emulating Android on the desktop, “that
sounds like a lot of work. What about all these third party services
with great features?” It’s true, there are a plethora of third-party
Instagram services like Gramblr and, enticingly, those services
generally have pretty awesome features like the ability to schedule your
Instagram posts. But we must clearly and strongly recommend against
them.
Instagram has a very clear stance, per their terms of use and community guidelines, against users sharing their login credentials with a third party. If you use any application or web-based service that does not send
you to the actual Instagram website to authorize the use of the
application using OAuth (the same system that allows you to use your
Google or Facebook account to log into a third-party service), then it
is in direct violation of Instagram’s rules and your account may be
disabled. Even if your account isn’t disabled, you’re still trusting a
third-party with total control of your account (and placing a lot of
trust in whatever security measures they have in place to protect your
login information—services like this are exactly how password leaks
happen).
If
you want to play fast and loose with the security of your personal
Instagram account dedicated to posting funny pictures of your cat, that
is your business. But when your business is literally, well, business,
you might not want to be in the position of explaining to your boss how
you got the company Instagram account shut down because you gave the
login to some random Instagram helper app you found online.
The Solution: Emulate Android with BlueStacks and Install Instagram
To
accomplish our end safely and without violating any Instagram rules,
we’re going to emulate Android with the popular BlueStacks emulator.
We’ve selected BlueStacks, among other Android emulation solutions, for
three primary reasons: it’s available for Windows and macOS, it’s
extremely simple to install, and it has an easy built-in way to share
content between the host computer and the emulated Android installation.
That makes it easy to save a file on your PC and switch over to the
Instagram app to post it.
Step One: Install BlueStacks and Instagram
We
aren’t going to run through this entire process here, since we’ve
already written a step-by-step guide to installing and configuring
BluesStacks. So head there, follow those instructions, then come back
here to pick up where it leaves off: with the application installed and
running.
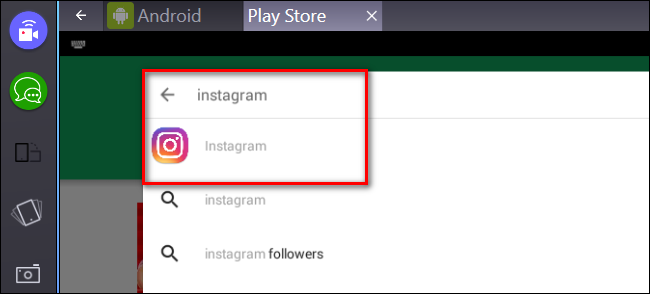
Launch BlueStacks and double-click on the Play Store icon.

Search in the Play Store for “instagram” to locate the official app.
Just
like when using an actual mobile device, you’ll click “Install” and
accept the things Instagram is allowed to access (like your media
files).

At
this point, you can run Instagram and log into it just like you would
on your phone. Take a moment to do so now before moving onto the next
step.
Step Two: Send Photos to BlueStacks for Easy Sharing
Now
that we have BlueStacks installed and you’re logged into your Instagram
account, shipping content from your computer to Instagram is absolutely
trivial. Let’s say, for example, that you want to share some photos of
sweet mechanical keyboards on Instagram. With BlueStacks fired up, it’s
literally two clicks to import a photo into Instagram and then
edit/tag/caption it like you would any other photo on your mobile
device.
Simply click on the folder icon on the sidebar of the BlueStacks window to open the host computer’s file browser.

Select the file you wish to upload and click “Open”.

When
you’ve selected the file you want, you’ll be prompted to select which
application on the emulated Android device should handle the file.
Select “Instagram” and click the “Always” button.
NOTE: If you plan on using mobile apps like Instagram’s official Boomerang app or
other design/layout helper apps, don’t check “Always,” as you may
occasionally want to send imported photos over to those apps.

Instagram
will load and the new post sequence will begin with Instagram prompting
you to crop the photo, select a filter, add tags, and ultimately click
the “Share” button.

Although
you had to jump through a few hoops to get here, you’re now able to
share content from your PC directly to Instagram without violating their
terms of use, giving your account credentials to a third-party, or
risking your account in any way—because as far as Instagram is
concerned, you just uploaded that photo from an Android phone.
How to Post to Instagram from Your Computer
![How to Post to Instagram from Your Computer]() Reviewed by Unknown
on
14:26
Rating:
Reviewed by Unknown
on
14:26
Rating:

No comments: